by Stacey Wiseman | Jul 8, 2014 | 10in10, Family Photographs, Photograph
On the Fourth of July, I realized it had been a while (a long while actually) since I completed a Day in the Life. While I don’t think our routine has changed all that much in the last few months, it’s always fun to peel back the curtain a bit and reveal what goes on inside our household. Of course, with the holiday, it was somewhat atypical….but still really fun to do.
I hope you enjoy!!!
In the morning, a 10k race happens at the end of our street.

L was a little unsure what to make of the runner in the middle of the road.

Then, a VERY simple breakfast of toast with butter. aka – nothing else in the house, aka – grocery shopping on the agenda today.

After breakfast, I had a quick conference call to chat with a lovely Accountability member.

Now, it was time for cleaning. My husband and I thoroughly cleaned our house.

While the kids watched some television. Or in my daughter’s case, the iPad in her room.

After several hours of cleaning, I decided to get a snack and take the kids to the park while my husband went to the grocery store.

My son picked out the spot for our picnic.

What’s a park visit without a turn at the swing?

If that wasn’t enough activity, it was now time for my afternoon walk. I loaded up my daughter in the stroller…

…hoping she would take a nap.

Success!
This next photo doesn’t really describe anything we did during our day. It’s a Just-Because photo. My daughter’s hair is just now starting to pony-tail-able.

It’s now about dinner time and my husband is getting things ready for the grill.

After dinner it was a little relaxation before…

FIREWORKS!!!

We let our kids stay up for the first time to watch the fireworks. Thankfully, we are able to see our city’s fireworks from our front lawn so my kids could be in pjs and we could easily take them to bed once they were finished. Man, were they wired though! They loved them.
This was my first time truly attempting fireworks. I’ll definitely have to try again next year!
So that was our day! What did you think! I’d love to hear from you and leave you some blog love back. Leave a comment below with your website so I can check out your Day in the Life, or most recent blog! 😉
by Stacey Wiseman | Mar 5, 2014 | Family Photographs, Photograph, Photography Tip
One of my photography goals in 2014 was to get in the frame with my kids more. At least once a month!
While this seems easy to do, it actually is quite difficult when you have two small children. To get out the tripod, set everything up, clear the clutter and get them to cooperate…suddenly the task seems impossible.
Following some advice from great blog posts, here’s what I do:
1 : Set up tripod
2 : Put my camera on timer
3 : Give us 10 seconds before the first photo is taken
4 : Program my camera to take 10 photos with a 2 second interval with one click of the shutter
5 : Bribe my kids with a sucker if they cooperate
6 : Let them push the shutter (taking turns) so it is fun and interactive for them
Recipe for success? With me, not quite.
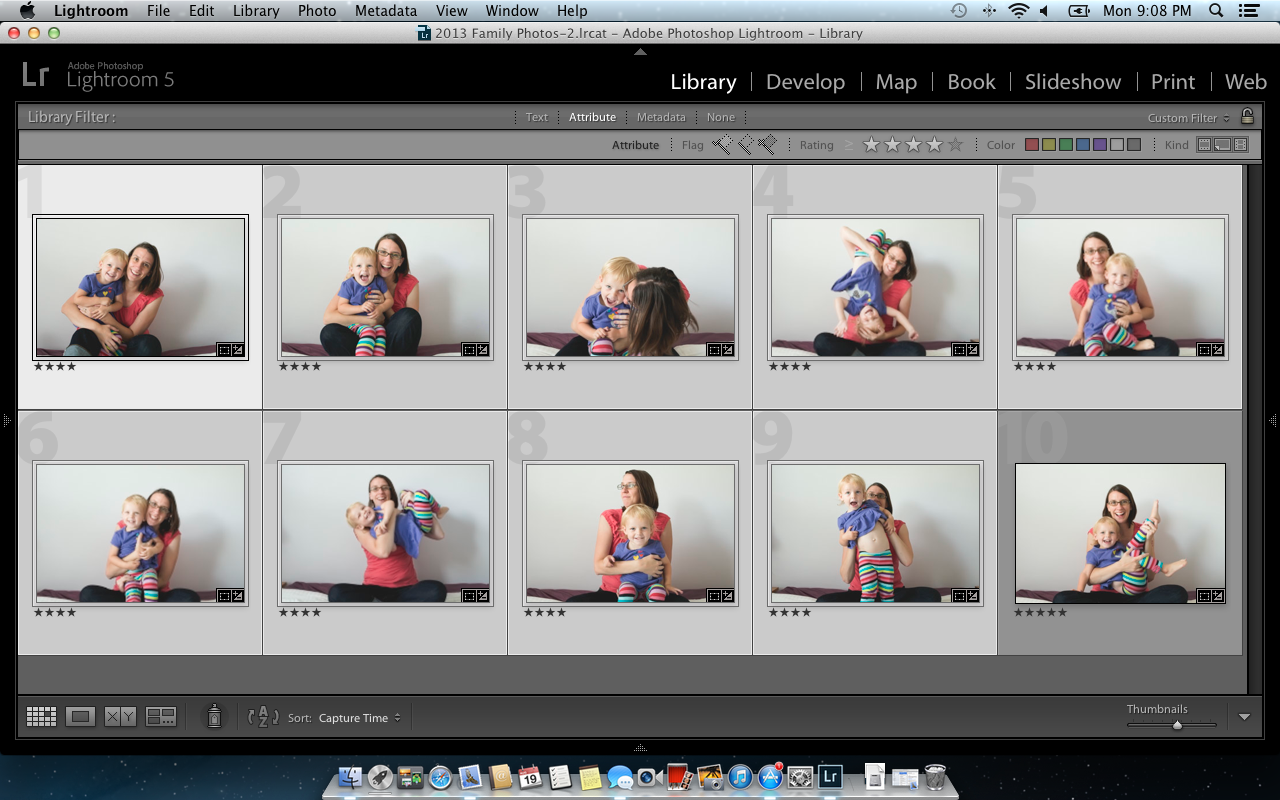
Out of 150 photos (yes – a lot of clicking going on!), I had 0 good photos, 20 “bad” photos and 130 automatic deletes. The elusive photo I wanted of all three of us looking lovingly into the camera didn’t happen.
Some are out of focus. In some I’m talking. In some I’m grabbing them to get back in the photo. Some have closed eyes. Some have grimaces. Some have limb chops.
But you know what? I don’t care. Of my 20 ‘bad’ ones, I still love them. In fact, I cherish them.
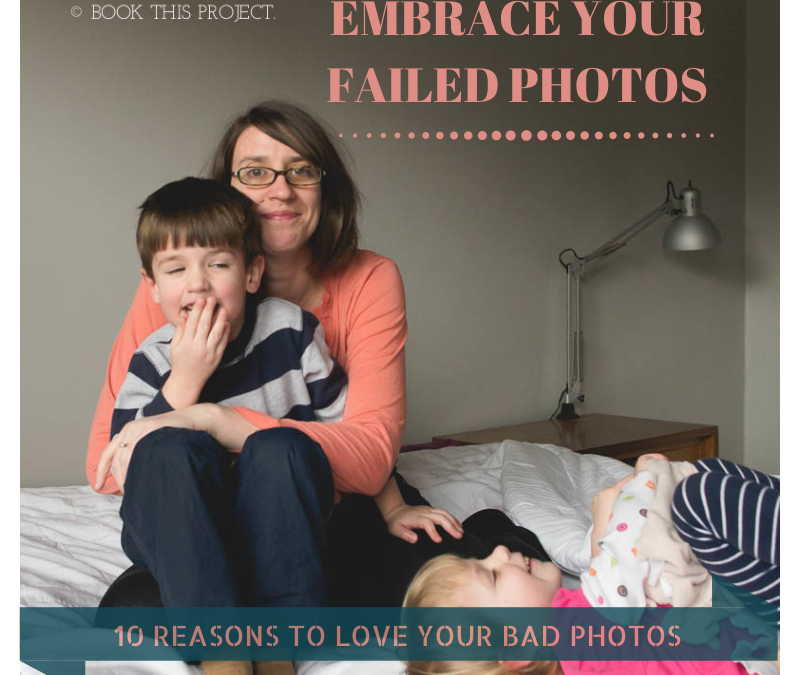
Here are 10 reasons why I love my bad photos.
1 : I love my daughter’s smile.

2 : I love my son’s tender heart.

3 : I love that my daughter has a lovey that barely leaves her side.

4 : I love my son’s love of legos.

5 : I love the giggles.

6 : I love my smile.

7 : I love the sibling almost-fights. (He didn’t actually knee her…but it sure looks inevitable in this photo.)

8 : I love Saturday afternoons with my kids.

9 : I love the kisses.

10 : I love my kids.

Of course, on this particular Saturday I don’t need 130 bad photos in my Lightroom catalog to love. About 12 will suffice. And they’ll look great in my annual photo book!
Now I want to see your bad photos! Let me know in the comments below, how have you embraced your bad photos? No need to be shy. Be proud! Blog about your love of bad photos and share a link below. I really want to leave some blog love for your bad photos too! <3
by Stacey Wiseman | Nov 18, 2013 | Photograph, Photography Tip, Q&A
 Question: How do you edit your photos?
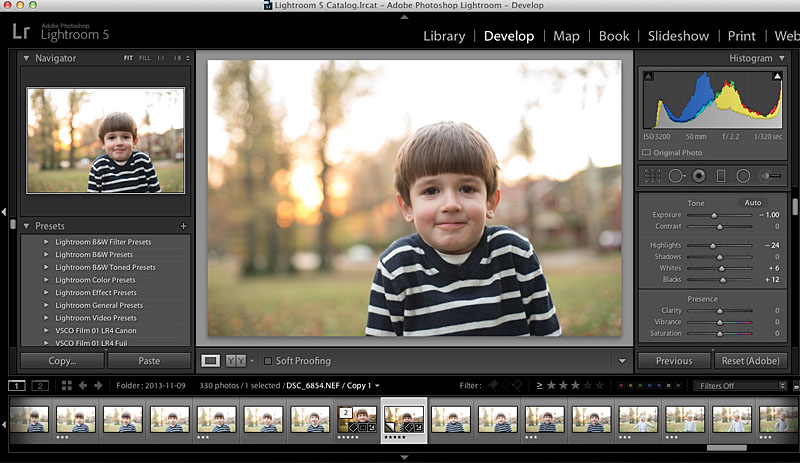
Answer: So even though I had a difficult time getting Christmas card photos, I thought today I would show you how I edited my fall photos.
First, I want to stress, I’m not the best photo editor, but I’m happy to show you what I’m doing at the moment. Usually my editing is minimal and has to happen pretty quickly.
Here are my basic steps.
1. Adjust exposure.
2. Adjust white balance.
3. Adjust the tone curve.
4. Adjust any color saturations or luminance.
5. Apply any specific crop.
6. Apply a slight vignette.
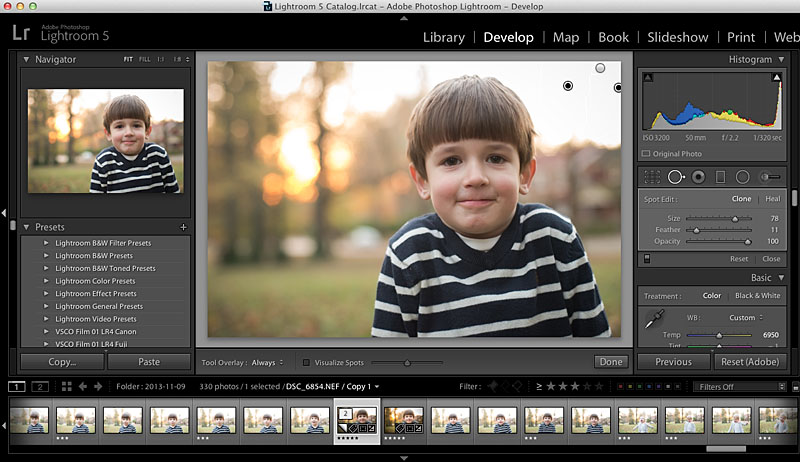
Now with fall photos, I want to play up the beautiful fall colors. So here is an extra step I did with these photos that I do not typically do on my photos. And it’s a new feature in LR5 – radial filter. If you haven’t used this tool yet, I really like it!
So let’s take a look at what I did for this straight out of the camera photo:
 The first step was to adjust my white balance and exposure.
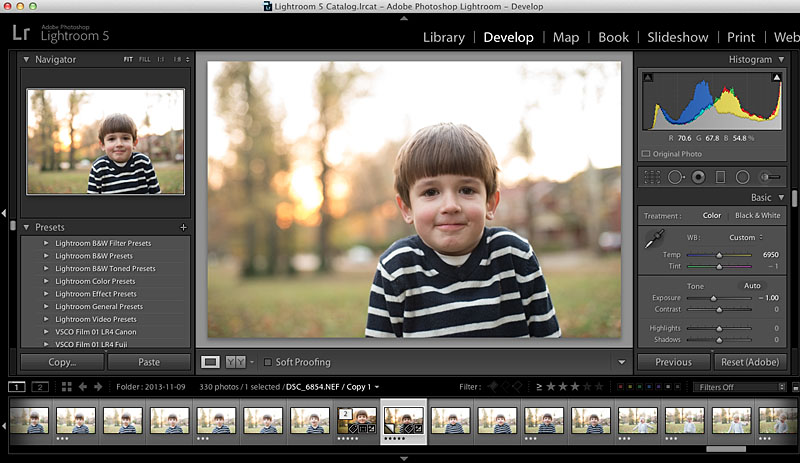 Then I make some adjustments to the highlights, shadows, whites, and blacks.
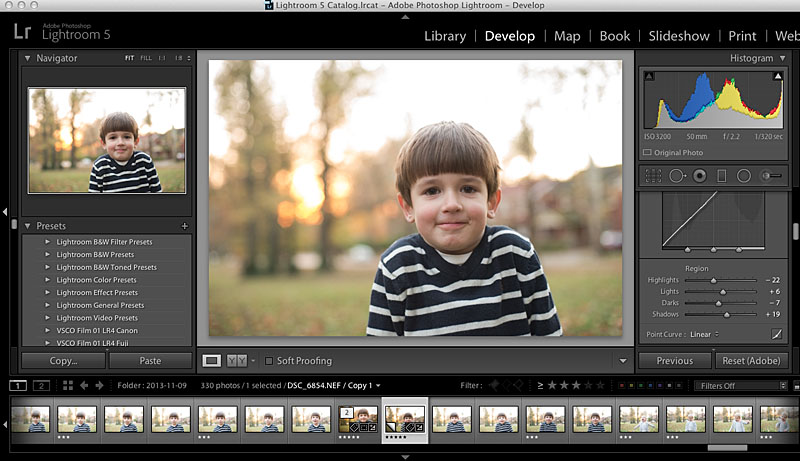
 Next up, the tone curve.
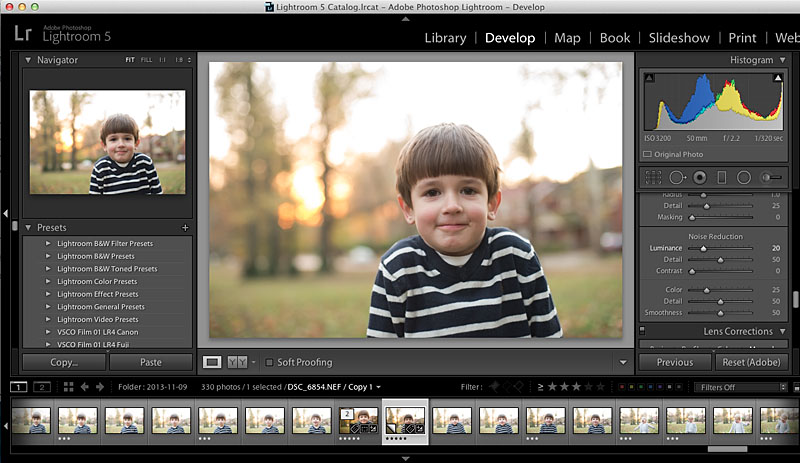
 Then a little Noise Reduction because even though this was outside, it was getting late and my camera was set to ISO3200.
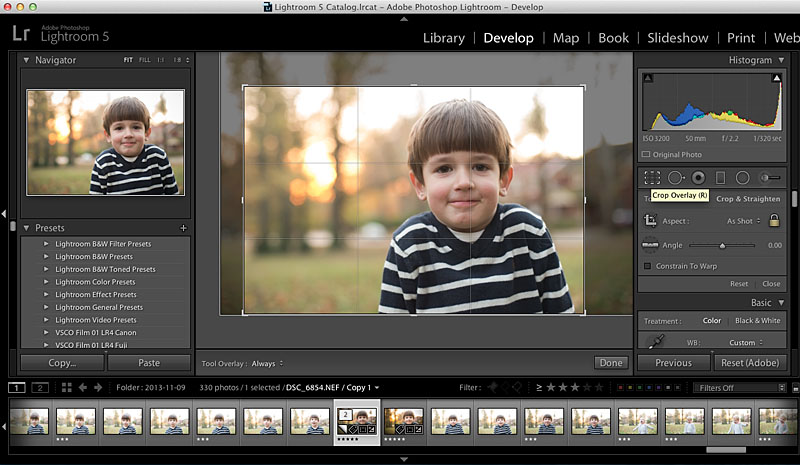
 A crop…for this photo, I used the rule of third guide within Lightroom.
 Then I cloned out a few of the distracting elements in the background, to the right.
Next step, I get to use this awesome radial filter tool in Lightroom 5. This tool allows adjustments to be made, in this case the background, without affecting the subject. And you can invert it as well. So I wanted to lower the exposure and increase the saturation in the background. This plays up the fall-ness in the photo.
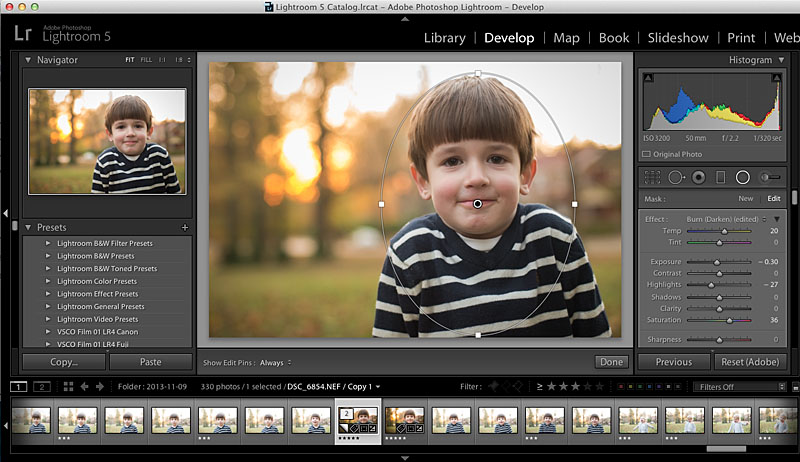
If you don’t have an earlier version of Lightroom, you can always use the adjustment brush to select the background. The radial filter is just a faster option!
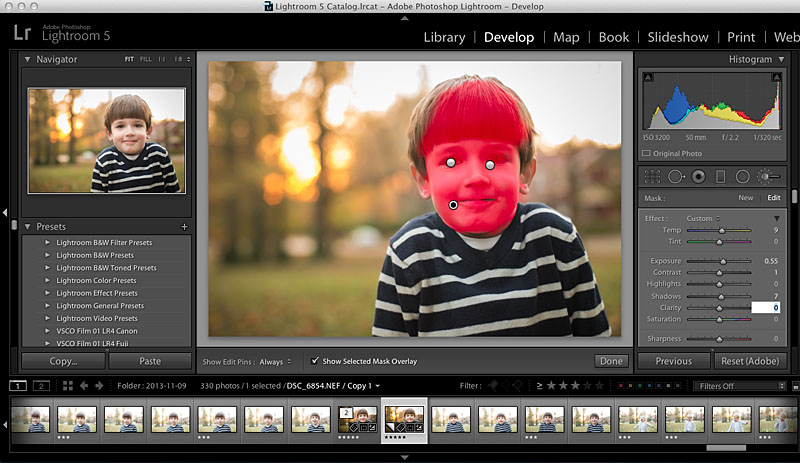
Finally, I make a couple more edits to his face using the Adjustment Brush tool. I lighten his eyes ever so slightly, reduce the circles under his eyes by reducing the saturation and add a little warmth and increase exposure to his face.
And there we have it! Here is my final photo…it’s not perfect but it’s definitely an improvement from where it started.

by Stacey Wiseman | Nov 17, 2013 | Photograph
Oh how hard it is for me to get a family Christmas card photo! I think it is the pressure for me to:
a) to get a photo with people smiling,
b) to get eye contact from everybody at the same time, or
c) to capture something creative.
But yet I try. I try several times. Last weekend, we had a warm weekend so I decided to take the kids out, sans coats, to achieve my illustrious goal.
And yes, I bribed my kids for each halfway decent attempt with cheese balls (thanks Halloween basket o’goodies)!
Apparently my son thought this was a pose I wanted.
 I’m not kidding. He did this over and over.


Then I’d get one looking at the camera while the other was looking silly.


Then I’d get the hug that looked more like strangling.

Or silliness that is too silly.

Why oh why is this so difficult! By the end of the day, I think I got a couple that I might be able to use but I’m also going to try for some indoor photos as well.
Make sure to check out the blog in couple of days when I show how I edited my fall photos.
So tell me in the comments, what’s your secret for getting Christmas card photos? Or where do you get the inspiration for your photos?
by Stacey Wiseman | Aug 19, 2013 | Photo Book Design Layout, Photograph, Tutorial
Getting in the frame is challenging to accomplish but can be so rewarding. Often times, we are so busy practicing our photography or documenting out kids’ lives that we forget to get in the frame so your kids’ have memories of you as well.
One of the reasons I love designing photo books is to step back and shoot with a purpose – take photographs specifically to go in your photo book.
And this is the perfect opportunity. Plan to photograph with the intention of this going in your photo book.
Here are some of my suggestions.
– 1 –
Set up the tripod.
Set up the tripod, the remote, the timer or get a friend/husband/relative to take the photographs for you. For this layout, my design was to feature several ‘outtakes’ so I was okay with multiplicity and imperfection.
I set up the timer with 10 consecutive shots to be taken every 2 seconds. My daughter would push the button and then run towards me.
– 2 –
Take the photos.
Take plenty of photos to make sure you get a few photos that will work for your book. The goal is to get at least one photo that you really love.
[divider] – 3 –
Select one.
Find your favorite photo, edit it as desired. Export to a larger size. For my photo book, I exported out at 9″ long by 6″ wide.

[divider] – 4 –
Select nine.
For this grouping, you don’t have to worry about perfect photos. This is mainly to get a sense of the fun that you were having with your little one. The key for editing this group is consistency. Export the photos at the same size. For my book, I exported with the short side set to 3″.
[divider] – 5 –
Design the layout.
Now it’s time to get the photos into your book. Select one layout with a grid of nine images and another layout with one photo box. If you had trouble narrowing your selection in step 4, create a grid with the appropriate number of photos. The key here is to create a grid of images. You decide if you want a margin or for it to bleed off the page. For the singular photo, decide if you want in the center or aligned to one side.

[divider] So make some time this week to get in the frame and design a spread for your photo book!
by Stacey Wiseman | Jul 3, 2013 | Photograph, wordless wednesday

by Stacey Wiseman | Jun 5, 2013 | Photograph, wordless wednesday

by Stacey Wiseman | May 1, 2013 | Photograph, wordless wednesday

by Stacey Wiseman | Apr 18, 2013 | Family Photographs, Photograph

[divider]It’s no secret that I’m not the chef in our family. My husband cooks all of our dinners – and he is amazing!
But in the middle of March, we had a stomach bug move through the house. At some point, my husband was not moving from the bed and I was responsible for dinner! Oh dear, this was going to be a challenge, because, besides scrambled eggs, it’s been a while since I was responsible for dinner.
I pulled a very easy sounding recipe from a recent issue of Parenting magazine. The recipe requires some tweaking but my son loved it. I think because of the cupcake shape.
[divider]  Ingredients:
2 cups of dry pasta (but I recommend parboiling the pasta)
1-1/3 cups chopped broccoli
1 egg
3-4 tablespoons of shredded mozzarella and parmesan cheese (I used an Italian cheese pack.)
1/4 teaspoon garlic salt
Mix all of the ingredients together. Fill wells of a muffin pan with mixture – about 3/4 full.
Distribute 1 cup of heavy cream among wells. I added a bit more cream to avoid crunchy pasta (my original mistake!).
[divider]
Top each well with bread crumbs.
Bake at 350 degrees for 20 minutes.
[divider]

[divider]
We now refer to them as pasta cupcakes!
by Stacey Wiseman | Jan 24, 2013 | 10in10, Photograph
I have decided to attempt another 10 photos in 10 hours once a month (second Saturday) each month for 2013. It love how it captures a day in our life. It also shows how the kids grow up and how events change throughout the year!
Last year, I featured a variety of layouts you could do for your photo book. Or you can create a separate book for only this project!
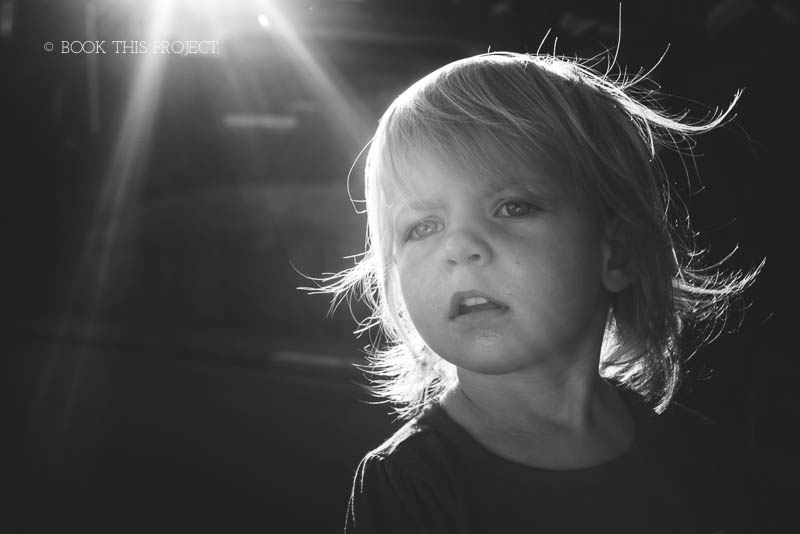
Here is what our January looked like! A lot of kids turning away from the light while they played – Ha!